My new sketch class starts Monday! The class forum is now open and everyone is checking in...join us this weekend if you aren't already registered.
It's a fun and motivating class...you will be amazed at how much scrapping you can get done with a few ideas, some new sketches and lots of great samples and motivation from your fellow scrappers!
Go here to sign up...you won't regret it!
Class registration
See you in class!

Saturday, December 31, 2011
Wednesday, December 28, 2011
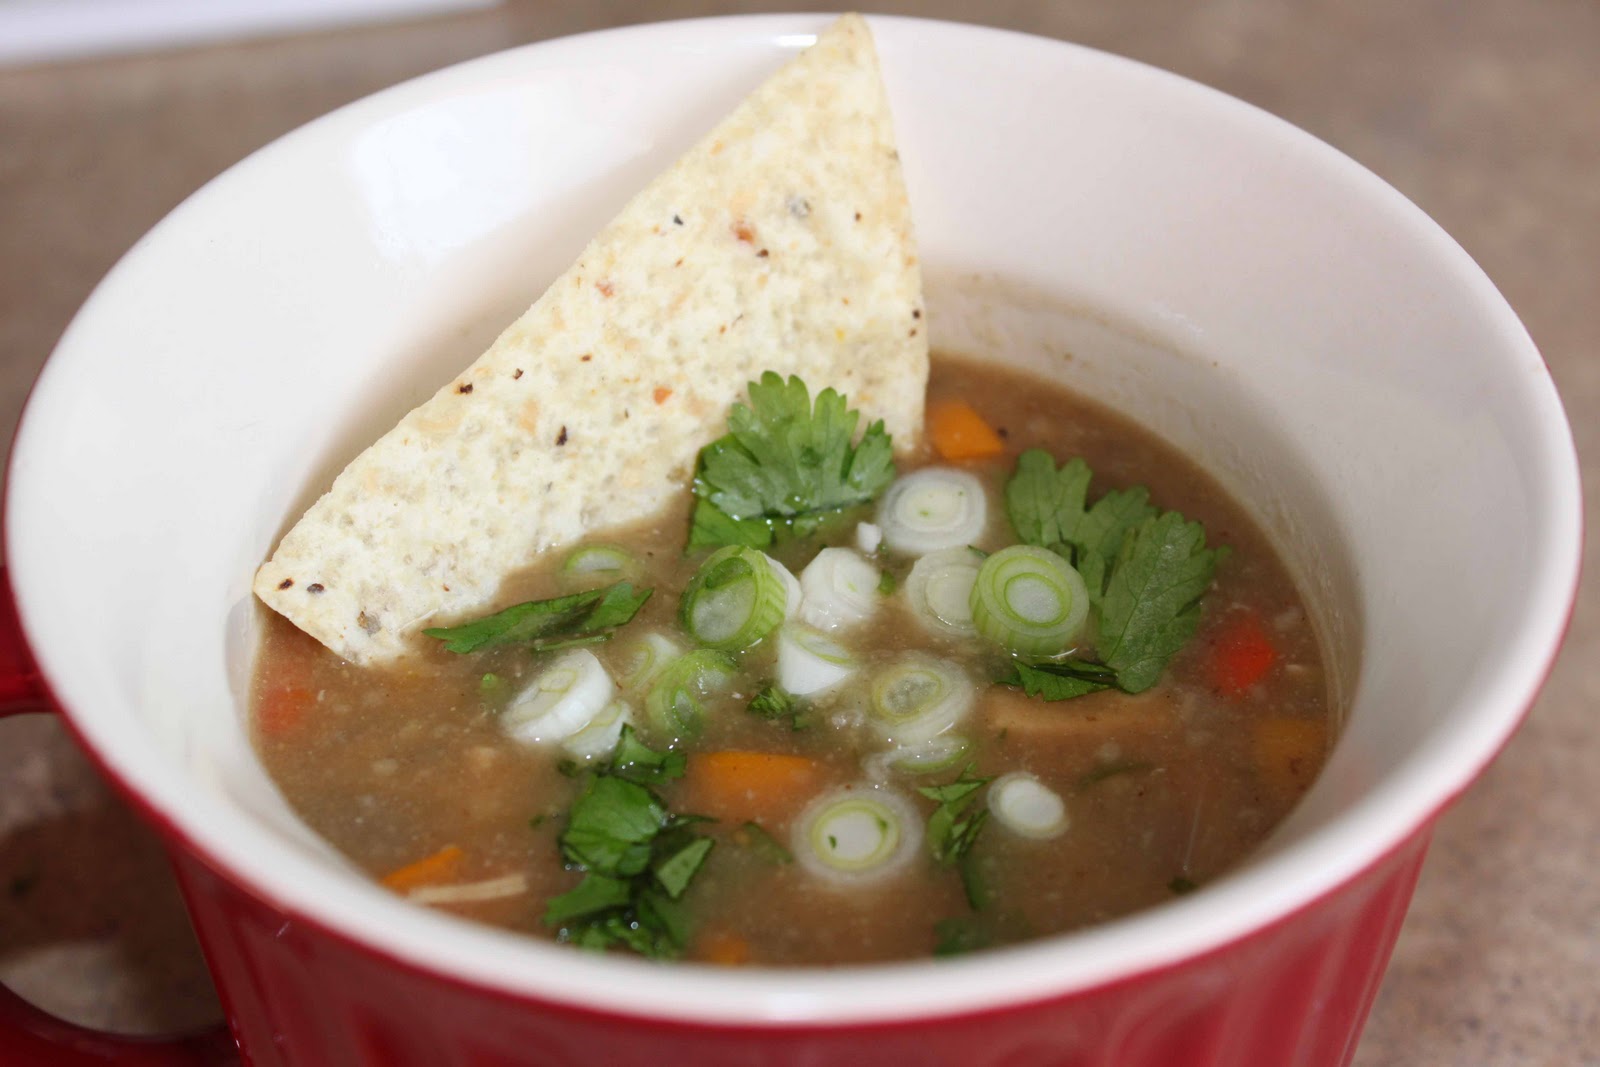
Yummy soup recipe! (Garbanzo beans....of all things!!)
A good friend of mine who lives just a couple of blocks away likes to pawn off give organic foods her family won't touch to me. (Her hubby gets free samples all the time with his job....fun!)
Well, I decided to use a rock solid bag of garbanzo beans from her that was sitting in my freezer. I found a couple of blended soup recipes online but they had ingredients I didn't have (or even usually buy) so I made up my own simple recipe. Guess what?? It is TASTY and very satisfying.
I love eating a bowl of soup for lunch to keep my calories down (I am a night eater!!). This was yummy and I have three more bowls waiting in the fridge. ;)


Garbanzo Bean Soup
Makes six 1 cup servings (I divided mine into four 1 1/2 cup servings)
16 ounces frozen garbanzo beans (or 2 1/2 cups cooked garbanzo beans)
4 cups chicken broth (I used one of those boxed cartons of broth)
2 cloves of garlic-chopped
1 small-medium onion chopped
Extra Virgin Olive Oil
Wedge of lemon
Directions:
Simmer beans, broth, garlic and onion in a large pot for about 30 minutes (with the lid on). Puree everything together (I used my immersion hand blender but you can do it in a blender in batches...be careful!!!). Add salt and pepper to taste.
Now, it was okay just like this. BUT...olive oil and lemon made it super yummy! Even my six year old son said how good the olive oil was drizzled on it.
Top with a drizzle of extra virgin olive oil (I used 1/2 tsp on my bowl) and a small squeeze of fresh lemon.
Calories (without the oil) in ONE CUP- 158
1/2 tsp EVOO- 20 calories extra (well worth it!)
Monday, December 26, 2011
Blog Giveaway WINNER!
Anyone else get completely distracted by the holidays?? LOL
The winner of the blog giveaway is...
mustangkaylasaid...
I have you on my Google Reader. That is the easiest system for me right now as I'm not on Facebook much. My train delrailed the end of October and has yet to be put back on track! ;-) I'm hoping in January I can get back into the swing of things!
The winner of the blog giveaway is...
mustangkaylasaid...
Friday, December 16, 2011
Peek-a-boo!!! (And a list of class photo sizes...)
Don't forget to enter my little giveaway a couple of posts below! I will draw a winner later today or this weekend. :)
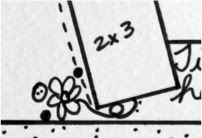
Here's another peek from the upcoming class-

Want to know more about my sketch class next month? Here are the photo sizes for all of the sketches in case you are a PLANNER!
January 2- Double Page Sketch (DPS)- Four 4x6’s (H)
Jan. 4- Three or Four 4x4’s
Jan. 6- Three 3x3’s (but three 4x4’s or two 4x6’s (H) would work pretty well here, too.)
Jan. 7- Two 4x6’s (H)
Jan. 8- Two 4x4’s (Could probably use two 4x6’s H without much change in the design)
Jan. 10- DPS Four 4x6’s (H), two 4x4’s
Jan. 12- One 4x6 (H), three 2x3’s (V)
Jan. 14- Two 4x6’s (H)
Jan. 16- One 4x6 (H), three 3x4’s (V)
Jan. 18- DPS Three 4x6’s (H), Four 4x4’s (You could easily switch out at least one of the 4x4’s with another 4x6)
Jan. 20- One 4x6 (H), one 4x4
Jan. 21- Two 4x4’s
Jan. 22- One 4x6 (H), Two 3x4’s (V) (One 4x6-V could easily replace the two smaller photos.)
Jan. 24- DPS Four 4x6’s (V), two 4x6’s (H)
Jan. 26- Two 4x6’s –or- four 3x4’s (V)
Jan. 28- Three 4x6’s (V)
Jan. 30- One 4x6 (H), one 3x4 (H) (or you could use a second 4x6 instead)
Hope to see you in classs!!!!
Here's another peek from the upcoming class-
Want to know more about my sketch class next month? Here are the photo sizes for all of the sketches in case you are a PLANNER!
January 2- Double Page Sketch (DPS)- Four 4x6’s (H)
Jan. 4- Three or Four 4x4’s
Jan. 6- Three 3x3’s (but three 4x4’s or two 4x6’s (H) would work pretty well here, too.)
Jan. 7- Two 4x6’s (H)
Jan. 8- Two 4x4’s (Could probably use two 4x6’s H without much change in the design)
Jan. 10- DPS Four 4x6’s (H), two 4x4’s
Jan. 12- One 4x6 (H), three 2x3’s (V)
Jan. 14- Two 4x6’s (H)
Jan. 16- One 4x6 (H), three 3x4’s (V)
Jan. 18- DPS Three 4x6’s (H), Four 4x4’s (You could easily switch out at least one of the 4x4’s with another 4x6)
Jan. 20- One 4x6 (H), one 4x4
Jan. 21- Two 4x4’s
Jan. 22- One 4x6 (H), Two 3x4’s (V) (One 4x6-V could easily replace the two smaller photos.)
Jan. 24- DPS Four 4x6’s (V), two 4x6’s (H)
Jan. 26- Two 4x6’s –or- four 3x4’s (V)
Jan. 28- Three 4x6’s (V)
Jan. 30- One 4x6 (H), one 3x4 (H) (or you could use a second 4x6 instead)
Hope to see you in classs!!!!
Wednesday, December 14, 2011
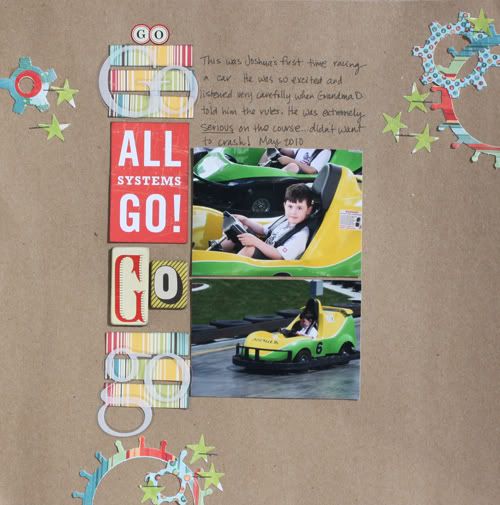
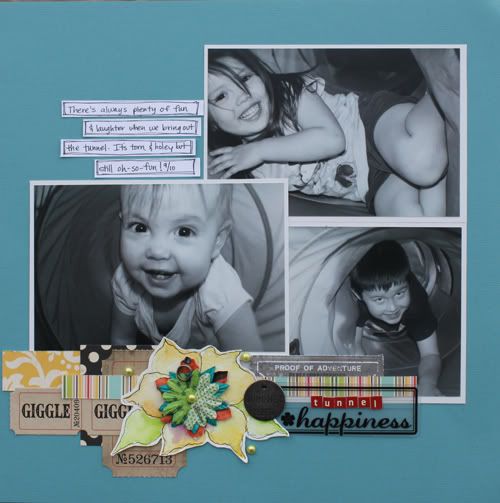
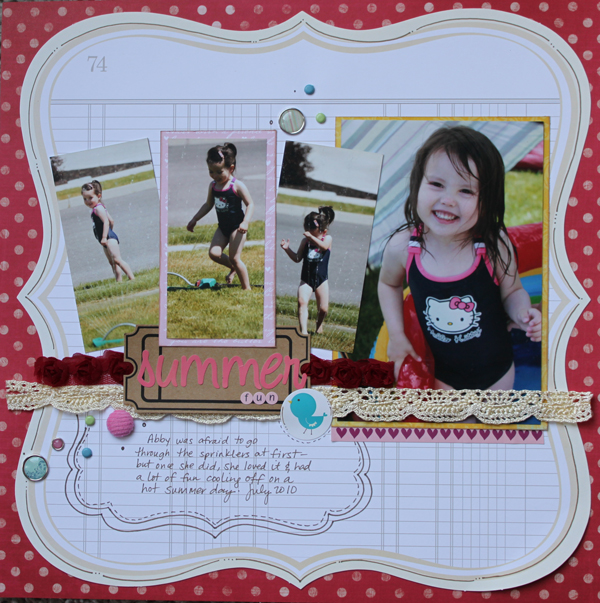
Some Layouts
After classes are over, I tend to forget about sharing layouts with the rest of the scrappy world. LOL! Silly me!! Anyhow, I know that many of you who were in class have seen these, but i thought I would share a couple with everyone else. :)
Here are some of my favorites from the last couple of classes-


Hope you are getting some scrappy time in these days! :)
Here are some of my favorites from the last couple of classes-


Hope you are getting some scrappy time in these days! :)
Monday, December 12, 2011
Sketches! (Plus, WIN GOODIES!!!!) -sneak peek!
Win this!! Read on to see how...

Soooo, it's been a while, huh? Life got in the way for a bit...but I am back to scrapping, sketching and blogging!!!
I just finished up SEVENTEEN brand new sketches and I am so excited about them! I have already created a page for a class sample and I can't wait to scrap more. :) Will you be joining us in class next month?
Want a little peek at a sketch?
How about a peek at the layout that goes with it? :)

I hope to see you in class!!!
Now, on to the GOODIES. :)
Let me know if you are still checking in with me to be entered to win a little goodie!! Just leave me a comment telling me how you keep up with my blog (google reader, plain old bookmark, or?) and I will draw a winner at the end of the week. :) Easy Peasy! If ya want an extra entry, share this post with your friends on the web and let me know where you shared it. ;)
Wednesday, August 31, 2011
New classes!
We have a couple of fun new classes coming up in the next few months at Inspired to Scrap! I have been busy scrapping for the sketch class that ended today and now I get to start on a project I have wanted to do for awhile...the topic is secret until class, though! ;) (Ok, watch for peeks!)
We have a fun family vacation coming up for a couple of weeks in October so we are holding a short class instead of a full one next. It will be a great time to get some gifts made for the holidays or just to learn how to make some fun mini albums for yourself!
Here's the schedule-
Sept.19-Oct. 2-“Get MORE for your Mini” Be prepared for two weeks of mini album fun! The design team will present several types of mini albums along with tips and techniques. Be prepared to work along with us and finish some cute little books! These make excellent GIFTS (think Christmas!), table toppers and all around little albums. Even if you don’t enjoy creating mini albums, you are welcome to adapt the ideas to full-sized layouts (or you might even change your mind. ) There will be a class PDF sent out after class ends with all of the information presented. Cost- $8
November 1-30- “Fast, Flat and Fabulous!” A full month of inspiration to help you create quick pages that look great with products you already have. The Design Team will be presenting pages and ideas with embellishments no thicker than a button in this fun class! *Look for a few new sketches sprinkled in along the way! We’ll have sharing, prizes and encouragement along the way.There will be a class PDF sent out after class ends with all of the information presented. Cost- $15
January 2012- Another sketch class! Details to come.
I hope you will join us for one or both of the upcoming classes! Look for a special price if you sign up for both...they will be available for registration this week on I2S. :)
We have a fun family vacation coming up for a couple of weeks in October so we are holding a short class instead of a full one next. It will be a great time to get some gifts made for the holidays or just to learn how to make some fun mini albums for yourself!
Here's the schedule-
Sept.19-Oct. 2-“Get MORE for your Mini” Be prepared for two weeks of mini album fun! The design team will present several types of mini albums along with tips and techniques. Be prepared to work along with us and finish some cute little books! These make excellent GIFTS (think Christmas!), table toppers and all around little albums. Even if you don’t enjoy creating mini albums, you are welcome to adapt the ideas to full-sized layouts (or you might even change your mind.
November 1-30- “Fast, Flat and Fabulous!” A full month of inspiration to help you create quick pages that look great with products you already have. The Design Team will be presenting pages and ideas with embellishments no thicker than a button in this fun class! *Look for a few new sketches sprinkled in along the way! We’ll have sharing, prizes and encouragement along the way.There will be a class PDF sent out after class ends with all of the information presented. Cost- $15
January 2012- Another sketch class! Details to come.
I hope you will join us for one or both of the upcoming classes! Look for a special price if you sign up for both...they will be available for registration this week on I2S. :)
Monday, June 20, 2011
Cowboy Caviar
To be honest, I didn't make this recently...but I need to make it again soon! I was looking back through my pictures and I realized I haven't shared this. It makes a yummy appetizer (or you could even have a big bowl of it for a meal!). We ate this with tortilla chips...yum!
![]()
Cowboy Caviar
1 can corn, drained and rinsed
1 can black beans , drained and rinsed
2 tomatoes diced
1-2 avocados, diced
1 green pepper diced
1 red pepper diced
½ onion diced
Cilantro to taste
Sauce:
¼ c. olive oil (try using less for less points?)
¼ c. red wine vinegar or apple cider vinegar
2 garlic cloves
1 lime squeezed
1 tsp. cumin
Pepper to taste
Mix sauce ingredients then toss with everything else. Adjust seasonings to taste.
Wednesday, June 1, 2011
Class starts today!
I hope you will be joining me for a month of sketch inspiration in my class, "Inspired by Sketches-3." You can register here- Inspired to Scrap Class Info.
Here's a peek of one my layouts for class-

I hope you make time to scrap this month!
Stacey
Here's a peek of one my layouts for class-

I hope you make time to scrap this month!
Stacey
Friday, May 27, 2011
Sketches
Here are the sketches I posted for my one hour challenges during our crop last week. Would love to see your pages if you use them!!


Sketch class starts next week! I hope to see you all there!


Sketch class starts next week! I hope to see you all there!
Thursday, May 19, 2011
One hour challenge! Today!!
Hey everyone, I am hosting a one hour challenge today on Inspired to Scrap! I hope you will join us at 1pm mountain time. Here's a link to the crop forum where I will be posting. :)
I hope to see you there!
I hope to see you there!
Sunday, May 15, 2011
Roasted Tomatillo Salsa
Lately, I have been signing up to get a big basket of fresh produce each week from Bountiful Baskets. It's a lot of fun because it's a great price ($15 for two baskets full), I am always surprised by what's inside and we get to try new and different things. This time, I added a Mexican pack and tortillas (cost was extra).
Here's everything I got this week:


Here's everything I got this week:
This morning I thought I'd try out roasting those tomatillos (and one of the anaheim peppers!). Here's the yummy salsa recipe I came up with.

Roasted Tomatillo Salsa
8-10 tomatillos (husked and rinsed)
1 anaheim pepper (optional)
1 small onion, roughly chopped
2 garlic cloves, minced
large handful of cilantro leaves and tender stems
1/2- 1 jalepeno, stem and seeds removed
1/2 tsp sugar
1/2 tsp each salt and pepper
To roast the tomatillos and pepper, preheat broiler on high. Roast for about 4 minutes on each side or until blackened (keep an eye on them!!!). Remove and allow the tomatillos to cool. Put the pepper in a ziplock bag for 5-10 minutes to steam. Peel the pepper and remove stem and seeds.
Cut away the tough stem area on the tomatillos. Add everything to a blender or food processor. Blend. Taste and adjust seasonings.
Enjoy! Off to make some quesadillas with our new fresh tortillas!
Saturday, May 14, 2011
Inspired Crop! Join us!
We're cropping next week...all week long! No need to pack up your stuff, you get to crop at home in your pjs. :) Here are the details and prizes-
"Walking on Sunshine Crop"
From May 16-22, we'll be hosting lots of challenges, games and fun on the Inspired to Scrap forum. We have some great prizes as well as a few smaller RAKS along the way. Want to see what you can win?


Here's our crop schedule:
Monday & Tuesday- Challenges will be posted along with inspiration.
All Week- Games, Raks and chatting!!
Thursday & Saturday- Special one hour, fast-paced challenges! 1 PM on Thursday and 7 PM on Saturday (mountain time). See the message board for more details.
Sunday- Finish up and get your entries uploaded
Monday- Draw winners!
**I hope to see you all there!!!***
"Walking on Sunshine Crop"
From May 16-22, we'll be hosting lots of challenges, games and fun on the Inspired to Scrap forum. We have some great prizes as well as a few smaller RAKS along the way. Want to see what you can win?
Here's our crop schedule:
Monday & Tuesday- Challenges will be posted along with inspiration.
All Week- Games, Raks and chatting!!
Thursday & Saturday- Special one hour, fast-paced challenges! 1 PM on Thursday and 7 PM on Saturday (mountain time). See the message board for more details.
Sunday- Finish up and get your entries uploaded
Monday- Draw winners!
**I hope to see you all there!!!***
Friday, May 13, 2011
6x12 layout...have you tried it?
One of our new DT members, Von, gave us the challenge to think out of the 12x12 box on Inspired to Scrap and complete a 6x12 layout. My first thought was, "no way!" I definitely didn't want to buy a different size album or page protectors. Well, she got me there because she also showed us we could just stitch down the center of one of our page protectors to make two slots. :) So I jumped in and tried it. Lots of fun...and fast!

I think I will be making more of these! This size is great for when you have just a couple of photos!
She also showed us how we can use cardboard for our background...check out her blog post! I think this makes a cool background for a boy's page. :)
Thanks Von! How have you all been challenged lately?
Monday, May 2, 2011
A few layouts
I have been scrapping a lot...even though I don't always share the layouts here (they are mostly for class!). Here are a few from the class that just ended at Inspired to Scrap where we have been using up older items in our stash:

Our new kit just came out and I can't wait to create with it! I have one layout that went into the kit flyer but I will be working on more with it this week! I hope you find some scrappy time soon! Link me up to some of your recent pages...would love to see them!
Stacey
Our new kit just came out and I can't wait to create with it! I have one layout that went into the kit flyer but I will be working on more with it this week! I hope you find some scrappy time soon! Link me up to some of your recent pages...would love to see them!
Stacey
Sunday, May 1, 2011
New Inspired to Scrap Design Team!
Our new Design Team for Inspired to Scrap!
Announcing the new Design Team for May –August 2011:
Angie Gutshall
Carol Sheetz
Von Tinney
Guest Design Team (May-June 2011)
Jaime Grider
Sarah Rentz
Guest Design Team (July-August 2011)
Janie Boots
Kate Vickers
Congrats ladies and I look forward to being inspired by all of you!
Announcing the new Design Team for May –August 2011:
Angie Gutshall
Carol Sheetz
Von Tinney
Guest Design Team (May-June 2011)
Jaime Grider
Sarah Rentz
Guest Design Team (July-August 2011)
Janie Boots
Kate Vickers
Congrats ladies and I look forward to being inspired by all of you!
Friday, April 29, 2011
Cornbread muffins- recipe
These are quick, easy and tasty. They are a sweeter cornbread. I think the original recipe called for at least twice this much sugar...but that was way too much in my opinion. These are great with soups, chilis and stews!

Cornbread Muffins:
1/2 cup butter, softened
1/3 cup white sugar
1/4 cup honey
2 eggs
1/2 teaspoon salt
1 1/2 cups all-purpose flour
3/4 cup cornmeal
1/2 teaspoon baking powder
1/2 cup milk
1/2 cup frozen corn kernels, thawed
Directions: Preheat oven to 400 degrees F (200 degrees C). Grease or line 12 muffin cups. In a large bowl, cream together butter, sugar, honey, eggs and salt. Mix in flour, cornmeal and baking powder; blend thoroughly. Stir in milk and corn. Pour or spoon batter into prepared muffin cups. Bake in preheated oven for 20 to 25 minutes, or until a toothpick inserted into center of a muffin comes out clean. Add a little butter and enjoy!
Thursday, April 28, 2011
Freezer French Toast -recipe
I used my homemade white bread for this...just because it is soooooooooo good with it. But you can use any sort of bread you have on hand. :) (But the thick, soft pieces of homemade white bread really work well as French Toast!)
Here are the recipe details (although I did end up mixing up more egg mixture to cook more slices):
6 eggs
1 1/4 cups milk
1 1/2 tablespoons sugar
1/2 tsp salt
Dash cinnamon and vanilla
12-16 slices white bread
Heat a large non-stick pan over medium heat and spray with cooking spray. (I use a large skillet that covers two burners and I can fit 8 slices at a time.)
Have a cute little helper drop slices of bread into the egg mixture, then turn and coat the other side.


Anyhow...this is really easy and simple. Nothing you probably didn't already do when you make French Toast. But I love that I discovered it freezes and reheats well! This worked out perfectly for camping for us. I made them ahead of time, froze them in freezer bags and just threw them into the camper fridge. They were defrosted when we wanted to cook them and all I did was add them single layer in a pan and baked them til hot. This would also be great for a quick breakfast at home.
Here are the recipe details (although I did end up mixing up more egg mixture to cook more slices):

Freezer French Toast
Makes 12-16 slices.6 eggs
1 1/4 cups milk
1 1/2 tablespoons sugar
1/2 tsp salt
Dash cinnamon and vanilla
12-16 slices white bread
Heat a large non-stick pan over medium heat and spray with cooking spray. (I use a large skillet that covers two burners and I can fit 8 slices at a time.)
Have a cute little helper drop slices of bread into the egg mixture, then turn and coat the other side.

Cook in batches, flipping after a couple of minutes (when it starts to brown). Flip and cook for 2 more minutes. Cool then freeze in single layer. Once frozen (about two hours) they can be packaged individually or placed in a single freezer bag.
To reheat:
Remove from freezer, and heat in toaster (haven't tried this yet!) or oven, then serve with butter and syrup. yum!
I store them like this in the freezer:

Wednesday, April 27, 2011
White bread recipe
We are usually wheat bread eaters here. Not that I don't like white bread...I guess I feel that wheat bread is better for us so that's what we eat. Honestly, I have rarely met a bread I didn't like. :)
Anyhow, this recipe makes for some yummy white bread...which is great plain, with butter or even better- as French Toast! (I will share that recipe tomorrow.) I hope you will give this recipe a try. As with any bread, adjust the liquid and flour slightly to make sure the consistency is right...not too wet or dry. I make this in my Kitchen Aid mixer with the dough hook, but you could do it by hand as well. I have no idea if this will work well in a bread maker. If you try it, let us know!

I doubled this recipe for two fluffy loaves to make lots of French Toast for the freezer (perfect camping food!)
White Bread
1 1/4 cups lukewarm milk
3 ½ cups all-purpose flour
1 1/2 tablespoons white sugar
1 1/2 teaspoons salt
2 tablespoons butter
2 teaspoons active dry yeast Directions: Combine the milk, sugar and yeast. Let sit a few minutes until foamy. Combine flour and salt in another bowl and whisk together. Add the butter (melted) to the milk and stir. Add flour and salt to the milk and knead for about 5 minutes. Cover and let rise for 30 minutes. Punch down, place in a loaf pan, cover and let rise for 25 minutes.
Meanwhile, heat oven to 350. Bake for 25 minutes.
Enjoy!!!

Tuesday, April 26, 2011
Design team call and a great prize!
You can win an Echo Park "Be Mine" paper collection by becoming a fan and commenting on the Inspired to Scrap Facebook page! Here is the link to the page-
Scroll down to the photo of the prize and leave a comment! Be sure to share the fun by re-posting about it on your page.
Inspired to Scrap is having a design team call and time is running out to apply! Anyone can apply. Join the forum and get to know us...we have a great group of scrappers! See the call details here-
Class is ending this week and it has been so much fun scrapping our stash! I will share some layouts soon!
I have plans for more layouts and recipes here...stick around and don't give up on me since I have been such a bad blogger lately! :)
Monday, April 25, 2011
Menu Monday
Whatcha cooking this week? We have easy meals...many from the pantry and freezer. Trying to use up a few things that have been sitting around. :)
Here's a photo of Thursday's recipe! (from over a year ago!)

Monday- pasta and bean skillet
Tuesday -quick barley chicken chili (recipe on the back of the barley box)
Wednesday- shepherd's pie, fresh bread
Thursday-lean and green chili
Friday- ww chicken parmagiana , pasta
Saturday- hamburgers, oven fries
Sunday- tuna noodle casserole, peas
So what are you cooking? Have you broken out the grill yet? :) We grilled some really yummy chicken over the weekend. Shoulda taken a photo...I will next time! It was a great recipe from one of my scrappy friends, Daiva. :)
Friday, March 4, 2011
A couple of layouts from class
We recently ended another sketch class at Inspired to Scrap and I had so much fun creating layouts, sharing techniques and being inspired by all of the other layouts and designer techniques! You should really join us in one of the classes...it's a great opportunity to get a lot accomplished! Here are some layouts I completed in class...one of each of the munchkins. :) In total, I completed more than 15 layouts!
The first two are based on sketches by me:


The first two are based on sketches by me:

Based on a sketch by Shannon Morgan:

Tuesday, January 18, 2011
Kit layout
Here's another layout I created using my Inspired to Scrap Jan. kit. I added the pink cardstock and the flowers from my stash. I used this for one of my challenges during the Whimsical Winter Crop. Have you used your kit yet?


Pumpkin Biscuits
I have been out of the habit of sharing recipes so I am trying to get back into it. I love browsing through other blogs to find new recipes so I want to share in the fun. :)
We've made these several times and they are soft and yummy. My oven never gets quite hot enough...it usually hovers just above 400. Even so, these still turn out tasty. This photo is not the best...it was the last lonely biscuit...a little thin from being part of the third round of cut outs. But I forgot to take a picture of the nicer ones. LOL Anyhow, we had these with Orange Honey Butter which was fun for a change but I think we prefer plain old butter. These are not too sweet...just a little. They are a great with almost any sort of meal!

4. Roll or gently pat dough to about 1/2-inch thickness (I make them more like 3/4-1 inch thick). Cut into 12 biscuits with a 2 1/2-inch biscuit cutter. Place the biscuits on a baking sheet coated with cooking spray.
5. Bake at 450° for about 11 minutes or until golden. Serve warm with 1/4 cup Orange-Honey Butter.
Orange Honey Butter
Mix 1/4 cup softened butter with 2 tsp honey and 1/2 tsp grated orange peel. Add more honey or orange to your taste.
Enjoy!!
We've made these several times and they are soft and yummy. My oven never gets quite hot enough...it usually hovers just above 400. Even so, these still turn out tasty. This photo is not the best...it was the last lonely biscuit...a little thin from being part of the third round of cut outs. But I forgot to take a picture of the nicer ones. LOL Anyhow, we had these with Orange Honey Butter which was fun for a change but I think we prefer plain old butter. These are not too sweet...just a little. They are a great with almost any sort of meal!

Pumpkin Biscuits
2 cups all-purpose flour (add more if sticky)
3 tablespoons sugar
2 teaspoons baking powder
1 teaspoon ground cinnamon
1/2 teaspoon baking soda
1/2 teaspoon salt
1/4 teaspoon ground nutmeg
1/4 cup chilled butter, cut into small pieces
3/4 cup fat-free buttermilk (Or combine 3/4 TBS white vinegar with 3/4 cup skim milk)
1/2 cup canned pumpkin
Directions:
1. Preheat oven to 450º.
2. Lightly spoon flour into dry measuring cups, and level with a knife. Combine flour and next 6 ingredients (flour through nutmeg); cut in chilled butter with a pastry blender or 2 knives until mixture resembles coarse meal.
3. Combine buttermilk and pumpkin; add to flour mixture, stirring just until moist. Turn the dough out onto a lightly floured surface; knead lightly 5 times. (I don't usually even knead that much...just enough to barely make the dough hold together...you don't want to over work dough for biscuits.) 4. Roll or gently pat dough to about 1/2-inch thickness (I make them more like 3/4-1 inch thick). Cut into 12 biscuits with a 2 1/2-inch biscuit cutter. Place the biscuits on a baking sheet coated with cooking spray.
5. Bake at 450° for about 11 minutes or until golden. Serve warm with 1/4 cup Orange-Honey Butter.
Orange Honey Butter
Mix 1/4 cup softened butter with 2 tsp honey and 1/2 tsp grated orange peel. Add more honey or orange to your taste.
Enjoy!!
Monday, January 17, 2011
Menu Planning Monday
Another week of meal plan sharing...yay me! :)

We tried a new blueberry muffin recipe this morning-yummo. The recipe is from Smitten Kitchen- http://smittenkitchen.com/2010/08/perfect-blueberry-muffins/ . We made them as mini muffins. It made exactly 24 nice "big" fluffy mini's. It is always so cute when the kids are waiting for treats to bake (Ellie does this funny little trying-not-to-smile-smile. LOL)


Tried any new recipes lately?
Here's our plan for the week. Easy stuff...you know, since I have sooooooo much time to spend cooking in the kitchen. ;)
Monday- Stinky Chicken (don't let the name fool you...this is delicious! It's a recipe from the Scrapshare cookbook...but basically chicken, potatoes and green beans baked with butter and a packet of Italian dressing mix).
Tuesday- Garlic Shrimp, grilled veggies, rice
Wednesday- Tacos
Thursday- Chicken and lentil soup (been on the menu for a couple of weeks and it keeps getting pushed back!), cornbread muffins (I will try to remember to get a photo of these...it's an easy and tasty recipe I have been making for a few years!)
Friday- Kielbasa with beans and rice
Saturday-Fried rice with meat and veggies (whatever we have...I make it up as I go!), Egg Foo Young
Sunday-Crockpot italian cream cheese chicken over pasta, a veggie
Find more meal plans and recipes at http://www.orgjunkie.com/
What are you making this week?
Thursday, January 13, 2011
Whimsical Winter Crop!
We have a big crop going on this weekend! I hope you will join us for fun, challenges, games and prizes!

You could win one of these:

Or something else fun! We'll also have some great class and kit specials going on!!
See you there. :)
You could win one of these:
Or something else fun! We'll also have some great class and kit specials going on!!
See you there. :)
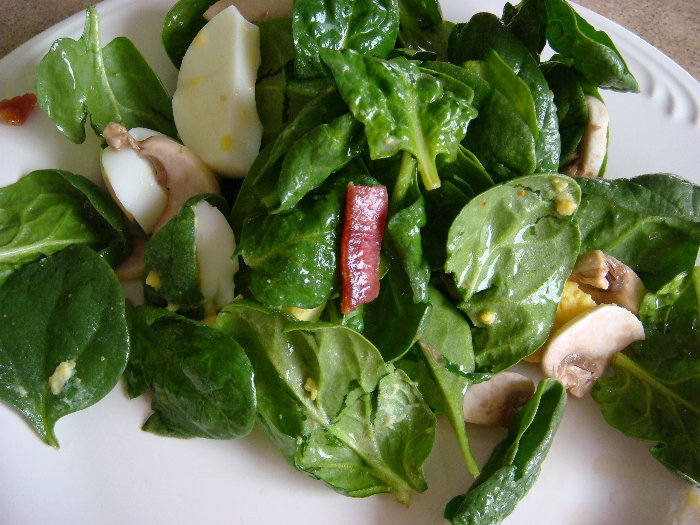
Spinach Salad
We have two favorite spinach salad recipes. I am sure I posted these before but when I made all of the blog changes, I accidentally deleted a bunch. Anyhow, here they are! I hope you enjoy them. :)
Warm Spinach and Mushroom Salad

4 slices bacon
2 eggs
2 teaspoons white sugar
2 tablespoons cider vinegar
2 tablespoons water
1/2 teaspoon salt
1 pound spinach
1/4 pound fresh mushrooms, sliced
DIRECTIONS:
Place bacon in a large, deep skillet. Cook over medium high heat until evenly brown. Crumble and set aside. Reserve 2 tablespoons bacon fat.
Place eggs in a saucepan and cover completely with cold water. Bring water to a boil. Cover, remove from heat, and let eggs stand in hot water for 10 to 12 minutes. Remove from hot water, cool, peel and cut in wedges.
Return 2 tablespoons bacon fat to skillet, stir in sugar, vinegar, water and salt. Keep warm.
Wash and remove stems from spinach, dry thoroughly and break into pieces in salad bowl. Pour warm dressing over and toss until coated.
Top salad with mushrooms and bacon, garnish with egg.
Spinach Salad (from my friend, Christine)
(beware of little fingers stealing the "goodies" out of this! LOL)

Fresh Spinach leaves
Pine Nuts
Cranberries
Dressing:
¼ cup each of balsamic vinegar and olive oil
1-3 cloves crushed garlic cloves
4 TBS brown sugar
*Combine first three ingredients in a large bowl. Mix dressing ingredients then toss everything together when ready to serve.
Warm Spinach and Mushroom Salad
4 slices bacon
2 eggs
2 teaspoons white sugar
2 tablespoons cider vinegar
2 tablespoons water
1/2 teaspoon salt
1 pound spinach
1/4 pound fresh mushrooms, sliced
DIRECTIONS:
Place bacon in a large, deep skillet. Cook over medium high heat until evenly brown. Crumble and set aside. Reserve 2 tablespoons bacon fat.
Place eggs in a saucepan and cover completely with cold water. Bring water to a boil. Cover, remove from heat, and let eggs stand in hot water for 10 to 12 minutes. Remove from hot water, cool, peel and cut in wedges.
Return 2 tablespoons bacon fat to skillet, stir in sugar, vinegar, water and salt. Keep warm.
Wash and remove stems from spinach, dry thoroughly and break into pieces in salad bowl. Pour warm dressing over and toss until coated.
Top salad with mushrooms and bacon, garnish with egg.
Spinach Salad (from my friend, Christine)
(beware of little fingers stealing the "goodies" out of this! LOL)

Fresh Spinach leaves
Pine Nuts
Cranberries
Dressing:
¼ cup each of balsamic vinegar and olive oil
1-3 cloves crushed garlic cloves
4 TBS brown sugar
*Combine first three ingredients in a large bowl. Mix dressing ingredients then toss everything together when ready to serve.
Black Bean Soup
Here's an easy and tasty recipe I said I'd share with you. This is filling and is low in calories/WW points. I am not familiar with the new WW points plus, so this is the old point value.
Black Bean Soup
(the original recipe is "spicy" black bean soup but my kids can't handle too much spice so I took it out. We did however add a big scoop of spicy salsa to the adult bowls this time and it was a yummy addition.) I think this one is from my friend, Becky. :)

Black Bean Soup
POINTS® Value: 3 Servings: 8 (about 1 ½ cups each)
1 medium onion(s), finely chopped
4 medium garlic clove(s), minced
3- 15 oz cans canned black beans, undrained
1 tsp ground cumin (or more!!)
14 1/2 oz fat-free chicken broth, or vegetable broth
10 oz canned tomatoes with green chilies,
11 oz canned yellow corn, drained
Instructions
1. Coat bottom of a large stockpot with cooking spray. Add onion and garlic and cook, stirring frequently, until onions are soft but not brown, about 5 minutes.
2. Place one can of beans in blender; add sautéed onion mixture and cumin. Cover and blend on high until smooth, about 30 seconds. Pour mixture back into stockpot. (**I ususally just combine steps 2 and 3 and blend it all in the pot with my hand blender. I also blend the tomatoes so my kids don't eat around them. lol).
3. Place second can of beans and broth in blender and puree until smooth; add to stockpot.
4. Stir third can of beans (do not puree first), tomatoes and green chilies, and corn into stockpot. Bring to a boil, lower heat to medium and simmer for 20 to 25 minutes.
**Serve with chips, avacado or toppings of your choice. (Extra pts.)
Black Bean Soup
(the original recipe is "spicy" black bean soup but my kids can't handle too much spice so I took it out. We did however add a big scoop of spicy salsa to the adult bowls this time and it was a yummy addition.) I think this one is from my friend, Becky. :)

Black Bean Soup
POINTS® Value: 3 Servings: 8 (about 1 ½ cups each)
1 medium onion(s), finely chopped
4 medium garlic clove(s), minced
3- 15 oz cans canned black beans, undrained
1 tsp ground cumin (or more!!)
14 1/2 oz fat-free chicken broth, or vegetable broth
10 oz canned tomatoes with green chilies,
11 oz canned yellow corn, drained
Instructions
1. Coat bottom of a large stockpot with cooking spray. Add onion and garlic and cook, stirring frequently, until onions are soft but not brown, about 5 minutes.
2. Place one can of beans in blender; add sautéed onion mixture and cumin. Cover and blend on high until smooth, about 30 seconds. Pour mixture back into stockpot. (**I ususally just combine steps 2 and 3 and blend it all in the pot with my hand blender. I also blend the tomatoes so my kids don't eat around them. lol).
3. Place second can of beans and broth in blender and puree until smooth; add to stockpot.
4. Stir third can of beans (do not puree first), tomatoes and green chilies, and corn into stockpot. Bring to a boil, lower heat to medium and simmer for 20 to 25 minutes.
**Serve with chips, avacado or toppings of your choice. (Extra pts.)
Thursday, January 6, 2011
Sketches, sketches and more sketches! (plus a peek!)
I am so excited about our next class- a sketch class! (Feb.1-15) We have 15 sketches plus a couple of bonus double page sketches to share along with samples, tips and techniques by our Inspired to Scrap Design Team and Guest Designers.
I love sketches because you can use them and adapt them to fit your needs...use any papers, photos, etc. that you want. I also love the challenge of trying to get them all completed during the class period (without deadlines, I don't think I would ever get any scrapping done!)
Here's a peek at one of my sketches this class-
 I hope you will consider joining us and challenging yourself to complete at least 15 layouts in February! We have several fun prizes lined up- little things and big things!!! It's going to be a blast...see you there.
Stacey
I love sketches because you can use them and adapt them to fit your needs...use any papers, photos, etc. that you want. I also love the challenge of trying to get them all completed during the class period (without deadlines, I don't think I would ever get any scrapping done!)
Here's a peek at one of my sketches this class-
Stacey
Monday, January 3, 2011
Menu Planning Monday


Do you have a plan for the week? Here's mine-
Monday- Lean and Green Chili, steamed cauliflower
Tuesday- Tacos and beans
Wednesday- CP Santa Fe Chicken, rice
Thursday- Black bean soup with chips and guacamole (I can't believe I haven't shared this recipe...I will take a pic and post it later in the week!)
Friday- Garlic chicken with broccoli
Saturday- Split Pea soup with bread
Sunday- Lentil and chicken soup
For more menu planning ideas, visit http://www.orgjunkie.com/ !!
Subscribe to:
Posts (Atom)